
If you need to lyse cells, homogenize tissue, emulsify formulations, or disperse nanoparticles reproducibly, an ultrasonic cell disruptor is one of the most versatile tools in a modern lab. But not every disruptor fits every workflow, and choosing the wrong configuration can easily lead to sample overheating, poor disruption efficiency, or probe erosion that contaminates sensitive samples. This guide is written for scientists, lab managers, and technicians who are evaluating ultrasonic disruption equipment—whether for routine protein extraction, nanoparticle processing, or scale‑up from a research bench to pilot production. By the end, you will know how to match disruptor type, power, probe geometry, and control features to your real applications, avoid the most common selection and operating mistakes, and approach a purchasing decision with clear technical criteria rather than marketing claims.
How Ultrasonic Disruption Actually Works
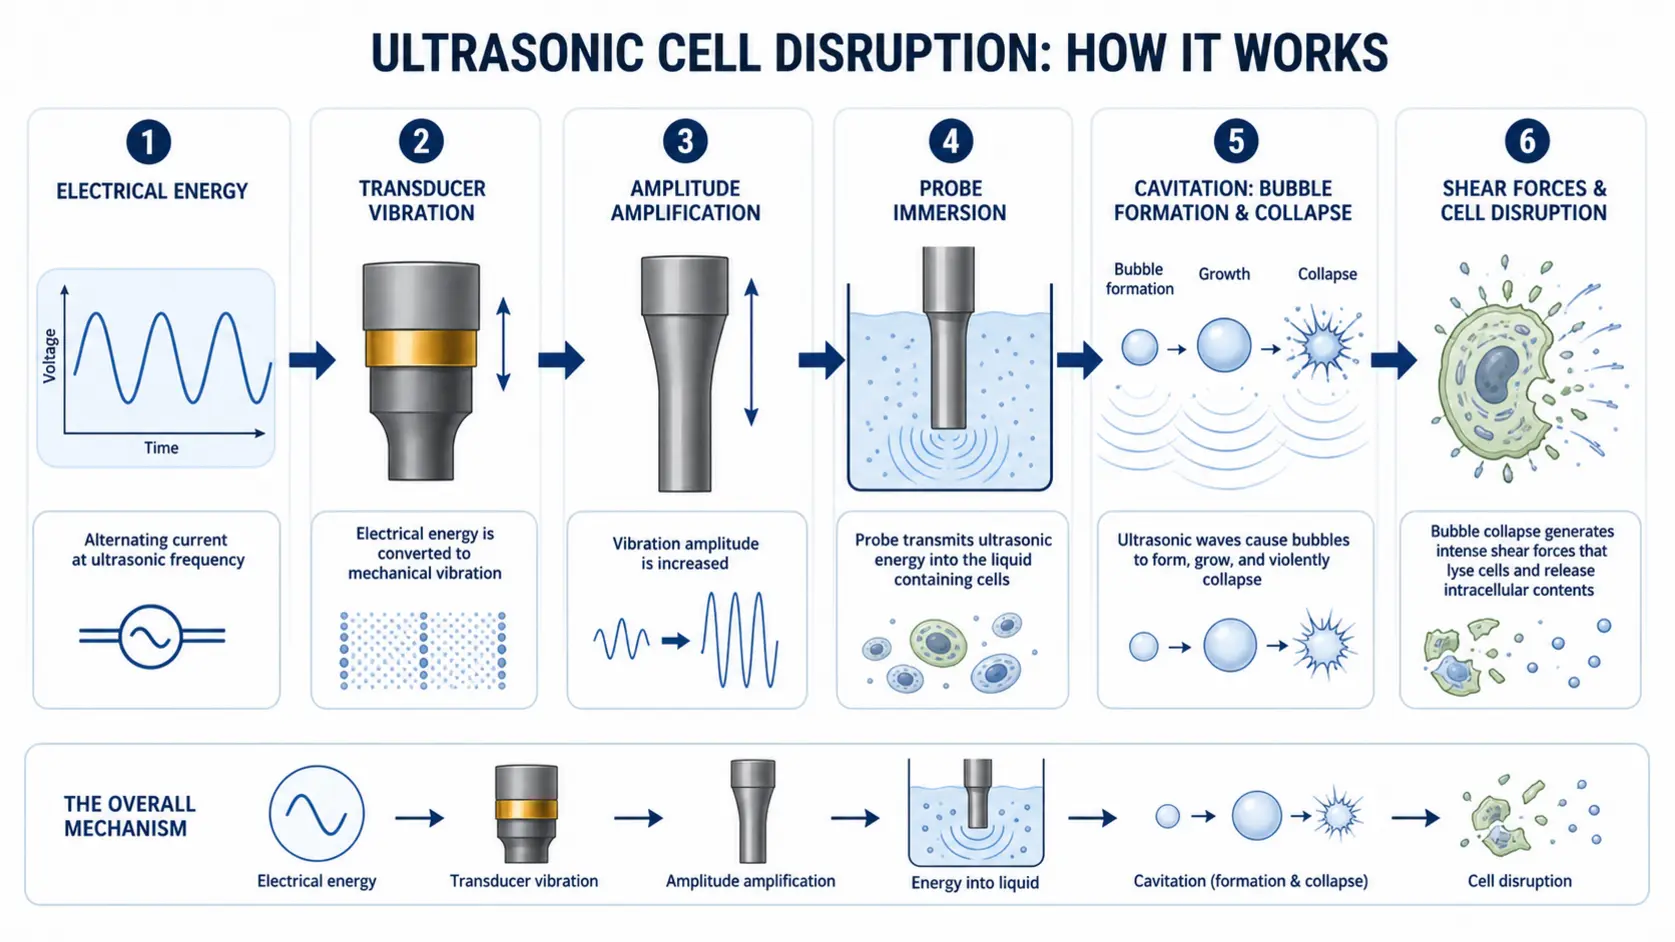
An ultrasonic cell disruptor converts electrical energy into high‑frequency mechanical vibration through a piezoelectric transducer. This vibration is amplified and delivered to a probe (horn) immersed in the sample. The probe tip oscillates at ultrasonic frequencies—typically 20–40 kHz—creating alternating high‑pressure and low‑pressure cycles in the liquid. During the low‑pressure phase, microscopic vacuum cavities form; during the high‑pressure phase, these cavities violently collapse. That phenomenon, acoustic cavitation, generates intense local shear forces, shock waves, and micro‑jets that tear apart cell walls, break aggregates, and disperse solids. The disruption effect is primarily mechanical, not thermal, although significant heat is generated and must be managed.
This is fundamentally different from an ultrasonic cleaner bath, which uses diffuse cavitation across a tank and is far less intense per unit volume. A disruptor concentrates energy into a small probe area, making it suitable for tough tissues, bacterial cells, and hard‑to‑lyse microorganisms. However, that same energy density can quickly overheat a sample or shear sensitive biomolecules if not correctly controlled.
Operator Note: Probe tip erosion is real—even titanium tips wear down over time, releasing microscopic metal particles into the sample. If you’re processing samples destined for ICP‑MS or sensitive cell‑based assays, monitor tip wear and consider using replaceable tips or non‑contact cup horns.
Probe‑Type vs. Non‑Contact Disruptors: Matching the Technology to the Task
Two main hardware configurations dominate the market, and the wrong choice is one of the most frequent reasons labs under‑utilize or replace their equipment within the first year.
Probe‑Type Sonicators (Direct Immersion)
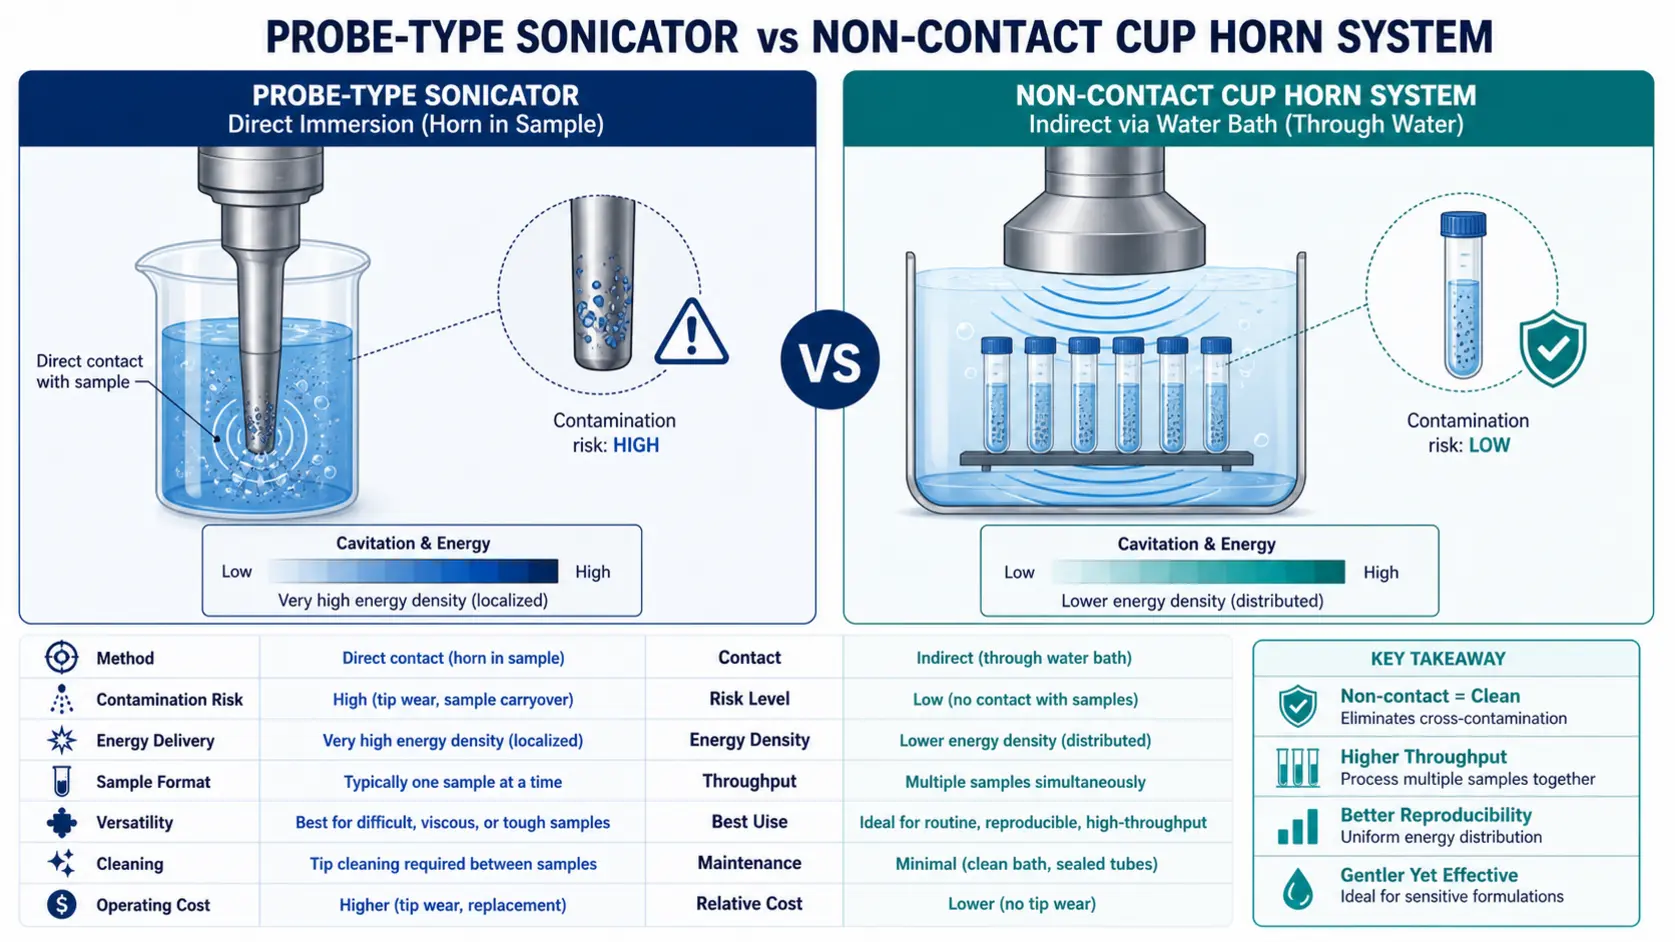
In probe‑type models, the horn directly contacts the sample. These deliver the highest power density and are the go‑to choice for cell disruption, tissue homogenization, and nanoparticle dispersion in volumes from a few hundred microliters to several liters. They offer versatile probe options (microtips for 0.2–5 mL, standard probes for 10–200 mL, and large horns for 500 mL–2 L or more). Trade‑offs include sample heating, aerosol generation (biohazard risk), and the need to clean probes between samples to avoid cross‑contamination.
Non‑Contact / Cup‑Horn Systems
Non‑contact disruptors—also called cup horns or indirect sonication systems—transmit ultrasonic energy through a water bath into sealed tubes or vials. There is no direct probe contact, so cross‑contamination is eliminated, aerosol release is contained, and multiple samples can often be processed simultaneously. These are especially valuable for sterile work, pathogen inactivation, or processing hazardous samples. However, the energy delivered per sample is lower and less uniform; disruption of tough tissues may require longer treatment times, and overall throughput for large volumes can be limited.
The choice hinges on your core application: if cross‑contamination control, biosafety, or simultaneous multi‑sample processing matters more than maximum power density, look at non‑contact systems first. If you need fast, high‑energy disruption of tough samples and have a cleaning/autoclaving protocol in place, probe‑type sonication remains the most efficient and scalable approach.
Selecting the Right Disruptor: What Experienced Operators Check
Spec sheets often emphasize wattage, but power alone tells you very little. A 1000‑watt sonicator with a poorly matched probe or inefficient transducer design may actually deliver less effective cavitation than a well‑engineered 500‑watt unit. Real selection depends on a handful of intertwined factors.
- Power output and duty cycle control: Continuous high‑power output rapidly heats samples. Pulse mode—with adjustable on/off cycles—is essential for temperature‑sensitive work. Check whether the instrument offers true duty cycle control (percentage of time the ultrasonic energy is active) or only fixed intervals.
- Frequency tuning and amplitude control: Many disruptors operate near 20 kHz, but some applications (like nano‑emulsions or liposome preparation) benefit from higher frequencies (30–40 kHz). Amplitude (tip excursion) directly affects cavitation intensity; being able to set amplitude as a percentage of maximum allows reproducible processing across runs.
- Probe material, diameter, and replaceable tips: Titanium alloy (Ti‑6Al‑4V) is standard for its strength and cavitation resistance. Probe diameter must be matched to sample volume—using a large probe in a small volume is inefficient and splatters, while a microtip in a large volume gives uneven treatment.
- Temperature monitoring and cooling: Integrated temperature probes with feedback control (auto‑shutoff or pulsing adjustment) prevent thermal degradation. For volumes above 50 mL, a recirculating chiller or ice‑water jacket is usually required.
- Programming, data logging, and reproducibility: Research labs often need to document amplitude, energy delivered (joules), temperature profiles, and cycle counts. Production environments may require recipe storage and user access control.
- Sample viscosity and volume scalability: Highly viscous samples dampen cavitation; sufficient power margin is needed. If you plan to scale from 10 mL to 500 mL later, check that the same processor supports a range of probes without a complete head upgrade.
Common Mistakes and False Assumptions That Derail Ultrasonic Disruption
Even experienced researchers sometimes get tripped up. Understanding these patterns early prevents wasted samples and frustrating troubleshooting later.
- Assuming more wattage equals better disruption: Cavitation efficiency depends on probe design, frequency, and amplitude control as much as total power. Too much power often creates cavitation shielding—a dense bubble layer near the tip that blocks energy transmission to the rest of the sample.
- Ignoring sample volume‑to‑probe mismatch: A probe that is too small for the volume leaves large untreated dead zones; a probe that is too large creates violent turbulence, foam, and excessive heat without proportional disruption.
- Running continuous sonication on temperature‑sensitive targets: Even a one‑minute continuous burst can denature proteins or degrade RNA unless active cooling is used. Pulsed mode with cool‑down intervals is not optional for most biochemical work.
- Treating an ultrasonic disruptor like an immersion blender: The probe should be centered and immersed to the correct depth—typically just below the liquid surface for small volumes, and deeper for larger volumes—without touching the vessel walls. Improper positioning reduces cavitation and can damage both vessel and probe.
- Assuming non‑contact systems are maintenance‑free: Cup horns still require water degassing, changing, and monitoring for microbial growth if used in a warm environment. Neglecting water quality leads to inconsistent energy transfer and contamination of the water bath itself.
Another subtle false assumption: that ultrasonic disruptors work equally well on all cell types. Gram‑positive bacteria, yeast, and filamentous fungi require significantly more energy and often benefit from enzymatic pre‑treatment or the addition of glass beads to increase mechanical shear. Sonication alone may be insufficient for highly resistant spores without optimized protocols.
Putting It into Practice: A Decision Workflow for Lab Selection
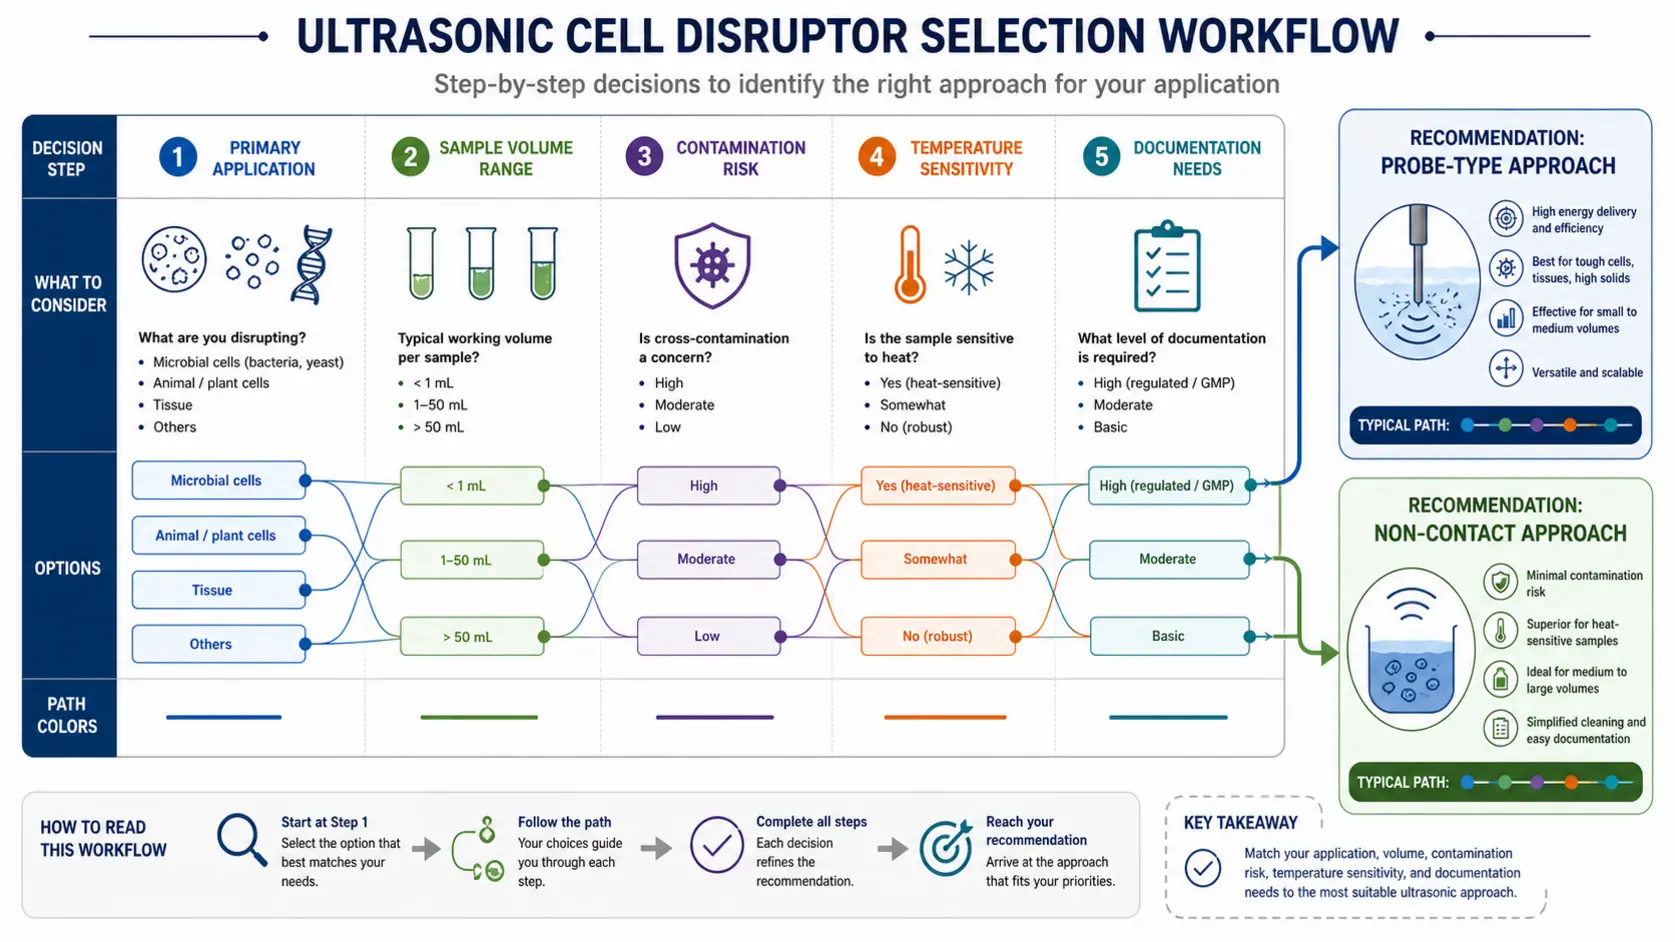
When a new disruptive technology is being evaluated, a structured decision path helps avoid impulse purchases based on a single feature. Use the following sequence to narrow your options.
- Define the primary application. Is it cell lysis (bacterial, mammalian, yeast), tissue homogenization, nanoparticle dispersion, or emulsification? Each stresses different disruptor characteristics. Cell lysis of tough microbes demands high amplitude; nanoparticle de‑agglomeration benefits from longer processing at moderate amplitude with good temperature control.
- Determine sample volume range, throughput, and tube/vessel format. Microcentrifuge tubes, 15‑mL conical, 50‑mL tubes, or beakers up to 500 mL will dictate probe size or cup horn compatibility. High throughput may require a multi‑sample non‑contact setup to avoid one‑by‑one probe cleaning.
- Assess contamination risk and biosafety level. If cross‑contamination is a critical concern (e.g., between different patient samples or cell lines), favor non‑contact cup horns, disposable probe tips, or dedicated probes per sample type.
- Verify temperature sensitivity of the analyte. Enzymes, RNA, and many proteins degrade quickly under heat. If target activity must be preserved, prioritize disruptors with integrated temperature feedback and active cooling connections. A unit that only has a simple timer may not be enough.
- Check for required documentation and programming needs. GLP/regulatory labs need electronic records of method parameters (amplitude, time, energy, temperature). Research labs may prioritize method storage and reproducibility, while teaching labs need simplicity.
- Test on your real sample before finalizing. Request a demonstration or rental unit. Process several batches of your most challenging sample and measure the actual outcome—protein yield, particle size, cell viability—rather than assuming the disruption was “complete” because the solution became cloudy.
Where many teams go wrong is starting with a budget ceiling and then looking for the highest‑wattage unit that fits. Instead, first define the minimal technical requirements above, then compare models that meet them. This lifts many mid‑range options into view that outperform cheap high‑wattage clones on sample quality and reproducibility.
Troubleshooting Ultrasonic Disruption Failures
When disruption results are poor—low protein yield, intact cells visible under the microscope, or excessive foaming—isolating the root cause saves time and samples. Here are common patterns and how to resolve them.
- Incomplete cell lysis / low yield: Likely insufficient amplitude or too short treatment time. Check that the probe diameter matches the sample volume and that the amplitude is set above the minimum cavitation threshold for your sample type. For bacteria, consider adding 0.1 mm glass beads or a brief enzymatic pre‑treatment.
- Sample overheating despite pulsed mode: The off‑cycle may be too short for heat dissipation. Lengthen the cooling interval, use an ice‑water bath around the sample vessel, or reduce the amplitude. Verify that the temperature probe is actually in the sample, not just near it.
- Foaming and protein denaturation: Over‑sonication or a probe positioned too near the liquid surface introduces air. Lower the probe slightly and reduce total energy input. Adding a tiny amount of antifoam (if compatible with downstream steps) can mitigate foam without sacrificing disruption.
- Erratic cavitation or “buzz” sound with no visible effect: The probe may be loose or the tip may be severely eroded. Tighten the probe coupling using the supplied wrenches and inspect the tip for wear or pitting. Also degas the sample if it contains dissolved air that dampens cavitation.
- Sample splashing out of tube/vessel: The vessel is too small for the probe diameter, or the pulse “on” time is too aggressive. Move to a slightly wider container or reduce amplitude initially, ramping up gradually after the sample is wetted.
- Black or grey contamination in the sample: Titanium particles shed from a worn probe tip. Replace the tip or switch to a probe with a hardened insert if processing abrasive samples. For critical assays, filter the lysate through a 0.45 µm membrane.
- Non‑contact cup horn: uneven treatment across multiple tubes: Check that all tubes are identical in material, wall thickness, and fill volume, and that they are symmetrically positioned. Degas the water bath and ensure the water level covers the sample level inside the tubes.
- Amplitude display not matching actual tip movement: The transducer may need recalibration or there is an amplitude drift due to aging piezoceramics. Perform a periodic check with a laser displacement sensor or compare sonication results against a reference standard, if available.
Preventive steps—regular probe inspection, checking the transducer coupling after every use, and documenting baseline amplitude settings for each sample type—catch most of these problems before they ruin a critical experiment.
Bringing It Together: From Bench Selection to Long‑Term Reliability
Ultrasonic cell disruptors are workhorses, but they are not commodity items where every model behaves the same. The right choice balances power, control, sample compatibility, and ongoing maintenance burden in a way that fits your lab’s daily reality. A research lab processing 0.5‑mL aliquots of mammalian cells has very different requirements from a pilot facility homogenizing liters of bacterial slurry. Similarly, a lab that must clean probes between each sample sees things differently from one that can dedicate a horn to a single product for a whole campaign.
Before you commit to a specific model, revisit the decision workflow above with your team. Then, when you are ready to evaluate hardware options, the table below highlights a curated range of ultrasonic disruptors and related equipment that address common research and industrial applications.
-
 AELAB Non-Contact Ultrasonic Wave Pulverizers AE-16TRead more
-
 AELAB Non-Contact Ultrasonic Wave Pulverizers AE-32TRead more
-
 AELAB Ultrasonic Cell Disruptors AE-1000NRead more
-
 AELAB Ultrasonic Cell Disruptors AE-E SeriesRead more
-
 AELAB Ultrasonic Cell Disruptors UP-250Read more
-
 AELAB Ultrasonic Cell Disruptors UP-400SRead more
The product group includes digital ultrasonic cleaners for pre‑cleaning and degassing steps, smart mechanical cleaners for heavier‑duty labware, probe‑type cell disruptors with precise amplitude control, and non‑contact ultrasonic wave pulverizers that eliminate direct probe contact. When comparing these, think about your main volume range, contamination risk, temperature sensitivity, and documentation needs rather than simply comparing wattage ratings.
If your application demands both direct sonication power and multi‑sample flexibility, you might pair one probe‑type disruptor with a non‑contact cup horn unit for different stages—for example, rapid initial disruption with a probe and final homogenization or degassing in a cup horn. The right equipment mix often yields better overall workflow efficiency than trying to force one unit to do everything.
Beyond the purchase, factor in consumables: replacement probe tips, sound‑abating enclosures (some units are loud enough to require hearing protection), and cooling accessories. Also verify that local service support, calibration services, and availability of critical spare parts are reliable—ultrasonic transducers and generators do fail, and a 4‑week repair turnaround can halt a research project.
Operator Note: If you hear a high‑pitched squeal during operation, stop immediately. That sound often means the probe is loose, the horn is cracked, or the transducer is malfunctioning. Continuing can damage the entire stack.
Moving Forward with Confidence
Selecting an ultrasonic cell disruptor isn’t about chasing the highest wattage or buying the most expensive unit; it’s about matching cavitation energy to the sample, controlling heat, avoiding cross‑contamination, and ensuring the system can be validated and maintained in your lab’s specific environment. A thoughtful selection process prevents the common disappointment of owning a powerful instrument that nobody trusts for sensitive work.
Do this next: Map your three most common sample types against the decision workflow in this article, noting required volume, tube format, and temperature tolerance. With that shortlist, request demo units or sample processing from suppliers and compare real disruption efficiency, not spec sheets. That hands‑on evidence will give you a far better basis for the investment than any brochure could.
Frequently Asked Questions
What’s the difference between an ultrasonic cell disruptor and an ultrasonic cleaner?
An ultrasonic cell disruptor is designed to deliver intense, focused cavitation through a horn or probe directly into a sample, making it suitable for cell lysis, homogenization, and nanoparticle dispersion. An ultrasonic cleaner creates diffuse cavitation across a tank for cleaning labware, degassing solvents, or gentle sample dispersion. The disruptor provides orders of magnitude higher energy density per volume.
Can I use a probe‑type disruptor without cooling?
For very short bursts (a few seconds) on temperature‑insensitive samples it is possible, but most biochemical applications require active cooling. Even with pulsed operation, heat builds up quickly. Without cooling, protein denaturation, RNA degradation, and sample oxidation rates increase dramatically. An ice‑water bath or recirculating chiller is standard practice.
How do I know which probe size to choose for my volume?
The probe diameter should be roughly matched to the sample volume: microtips (2–3 mm) for 0.2–5 mL, standard probes (6–13 mm) for 10–200 mL, and large horns (19–25 mm) for 250 mL–2 L. Using an undersized probe leaves untreated zones; an oversized probe creates splashing and inefficiency. Always consult the manufacturer’s volume range recommendation for each probe.
Are non‑contact cup horn disruptors as effective as direct probes?
They are generally less intense per tube because energy passes through water and tube walls, but they excel where cross‑contamination must be avoided or multiple samples must be processed simultaneously. For tough bacterial or tissue samples, a probe‑type system will complete lysis faster, but for BSL‑2/3 containment or sterile processing, the cup horn approach is often preferred.
What should I look for when comparing ultrasonic disruptor models?
Beyond power rating, evaluate amplitude control range, pulse programmability, duty cycle control, temperature feedback and auto‑shutoff, probe material and replaceable tip availability, noise level, and the availability of method storage/data export. The ease of cleaning and availability of service support are equally important for long‑term ownership.
How do I maintain my ultrasonic disruptor to keep it performing well?
Regularly inspect the probe tip for pitting or erosion and replace tips when worn. Check the probe‑transducer coupling for tightness, clean probes immediately after use to prevent dried sample residue, and follow the manufacturer’s recommendations for generator ventilation and periodic calibration. For cup horns, change the water frequently to prevent microbial growth and degas before use.